Showing posts with label calculations. Show all posts

Learning from the LEED-Homes Platinum 100K House

A few years ago, Chad Ludeman and Nic Darling of Postgreen embarked on a journey "to build a LEED Platinum home for $100,000 in hard construction costs." Lucky for you, they not only succeeded but documented the entire process on their popular 100K House blog!

100K House

Image credit: Postgreen

While their blog covers topics beyond the original project and is definitely a recommended read as a whole, I wanted to highlight some of the posts I found most helpful for LEED APs embarking on a LEED-Homes project... or you could just go directly to the 20 posts under the LEED category:

New readers may not be aware of a similar that that I profiled a over a year and a half ago (has it been that long???), The Lambert LEED Home. Know of other great LEED Homes resources that deserve attention? Let us know by leaving a comment.

Daylighting Simulation in LEED 2009: 2 Models = Unanswered Questions

Despite the fact that I almost live on the interwebs and have a penchant for butchering images in photoshop, I'm not the most technologically advanced person when it comes to Revit and the bevy of associated environmental modeling programs available. I got an email from one of my colleagues asking how to interpret the following requirement for compliance with EQc8.1, Daylight and Views, Daylight credit using Option 1, Simulation, and I'd like your help in determining an appropriate response:

"Demonstrate through computer simulations that 75% or more of all regularly occupied spaces areas achieve daylight illuminance levels of a minimum of 25 footcandles (fc) and a maximum of 500 fc in a clear sky condition on September 21 at 9 a.m. and 3 p.m...”

The issue here is that they ask you to generate two models (one at 9am and the other at 3pm), but no guidance is provided about how to combine these models to show that 75% of the space meets the footcandle requirements...

What the hell does this image have to do with a post about daylighting compliance?*

Previous editions of LEED forced you to simulate the daylighting levels at noon, and I suspect that by using solar positions that are 'lower' in the sky more projects should be able to claim credit since daylight should penetrate more deeply into the building. The reference guide goes on to discuss other issues surrounding the simulation, but none resolve the problem brought to my attention earlier today. My reading of this leads me to two possible interpretations:

'Subtractive' Compliance

In the 'subtractive' compliance scenario, you would take the two floor plans and run the daylight intensity model for both and mark the compliant square footage on each. You would then combine the two models, and only include the spaces that are compliant on BOTH models in your calculations to determine if 75% of the overall regularly occupied space and mark your compliant square footage. The result is a combined space that is smaller than either model individually.

'Additive' Compliance

This interpretation would require you to generate the two models, but instead of cutting out the spaces that are not compliant at both times, you combine the two for a larger footprint than was created by either model.

The final word?

After I wrote 95% of this post, it occurred to me I should scan the forums for an answer, and I found a reasonably definitive answer on the LEEDuser forums**, courtesy of Jill Dalglish at Dalglish Daylighting:

"I received this statement in a response from USGBC Technical Customer Service: 'The simulation needs to document compliance at both 9:00 a.m. and 3:00 p.m.. Only areas that meet the requirements at both of these times are considered complaint.' To me, this means that you cannot take an average and you cannot evaluate the two times separately, ie. you cannot include the space in the compliant area if 75% of it meets the footcandle requirement at 9am and then also meets it at 75% at 3pm (unless that 75% overlaps.)"

This clearly supports the 'subtractive' method of compliance, but I'd love to hear from someone who has performed and submitted and had this strategy approved in a LEED review. Please share your experience by leaving a comment!

Forgive my Rant

Another sidenote to anyone at the USGBC responsible for developing the reference manuals: This is ridiculous! It's one thing that this slipped through the cracks in the first edition of the reference guide, but to also miss it in the addenda makes me want to scream... It would be one thing if it was a minor issue, but people cannot complete their documentation without this critical piece of knowledge! How is this overlooked (at least) twice?

* Free kudos and (if desired) a link to the site of your choice to the first commenter who points out what, if anything, this picture has to do with this post... Liz, you can't enter!

** FULL DISCLOSURE: LEEDuser is a sponsor of this site... I know there's been a bunch of of 'full disclosure' posts lately, and I can only offer my word that it's not by design! I really do use my sponsor's sites on a regular basis.

LEED VOC Budget Calculations Explained

I stumbled onto concise but comprehensive article by Chris Dixon in Walls & Ceilings magazine called Straight Green: Alternative VOC Calculation for LEED. Basically, it walks you through the process of preparing a VOC budget (what you need to do if the contractor slips in a non-compliant paint or adhesive) as an alternative compliance measure for achieving EQc4, Low Emitting Materials credits. I could go into more detail, but instead I'll just recommend reading the article for yourself!

LEED VOC Budget

VOC Budget Example

This article was published in 2008, and references LEED-NCv2.2 standards, though my understanding is that the methodology should not have changed in the 2009 edition of the same system, and that it should also apply to LEED-CI, LEED-CS, and LEED-Schools systems.

via 4specs discussion forum

Key Baseline Changes in 2009 Edition of WEc3, Water Use Reduction

I recieved a call from a project architect this morning who had designed a large LEED Core and Shell v2.0 project who in turn had received a call from another architect who is working on a LEED Commercial Interiors v3.0 (2009 edition) upfit of the same building. While we were able to earn 2 points for reducing expected water use by 30.1% in the LEED-CS submittal, when the upfit architects were looking at the water use reductions based on the LEED-CI requirements they determined that the anticipated reduction was only 10.8%. This level of reduction doesn't even meet the new 20% reduction requirement found in the WEp1, Water Use Reduction prerequisite!* What happened? Did we miscalculate the original submittal?

faucet fail

The Unusable Faucet... The latest in water use reduction technology

We (or rather our consultant engineer) didn't miscalculate anything! After taking a closer look at comparing the calculations for both the v3 and v2 editions, we discovered that LEED has adjusted the baseline rate for public faucets from 2.2 gpm down to 0.5 gpm, meaning that while we had substantial flow rate reductions in the LEED-CS v2.0 submittal, none could be claimed for the LEED-CI v3.0 calculation even though the fixture specs were the same. The updated baseline standard applies to v3 editions of LEED-NC, LEED-CS, LEED-Schools, and LEED-CI systems. The change stems from the inclusing of the "maximum [flow rate] incorporated into the national Uniform Plumbing Code and the International Plumbing Code[s]" into the updated requirements. LEED-EB:OM v3.0 sets the anticipated baseline on these standards, but that was the case on the v2 edition as well so nothing has changed there from what I can see.

While the v2 baselines applied a 2.2 gpm baseline requirement for all bathroom lavatories, the v3 system distinguishes between 'public' and 'private' commercial restrooms and residential bathrooms. A private restroom is anything that would regularly be used by only one person at a time: hotel/motel guest bathrooms, hospital patient room bathrooms, and arguably bathrooms serving single offices (e.g. bathroom in the CEO's office used only by that person). All residential bathrooms and these private bathrooms are still held to the same 2.2 gpm baseline as before. Everything else (hotel lobby, shared office, school, and retail and restaurant bathrooms, etc.) are now held to the .5 gpm baseline.

I should point out that I think this is a good change... it's ridiculous to put anything other than a .5 gpm in sinks that will likely never be used for anything other than handwashing or perhaps brushing your teeth, especially when you consider a .5 gpm replacement aerator costs about $2. It also makes sense to keep private bathrooms to a higher standard, since people may be filling coffee pots or other containers that could be annoying if you were limited to such a low flow rate. I've installed a variable flow rate faucet in my kitchen that works great since I leave it on the low setting until I need to fill something up, but my bathroom sink uses a .5 gpm aerator. I should point out that people using on-demand water heaters may have problems in that the flow rate is so low that it may not trigger the water heater to turn on!

Bottom line... I think this is another instance of LEED moving in the right direction by tightening the requirements a bit, but people used to the v2 systems such as myself should definitely make a point to realize that a 20% reduction in v2 is not necessarily 20% in v3. Disagree with me? Please let me know by leaving a comment!

*I should note here that as the bathrooms in question are part of the shared core space of the facility, they should presumably not impact the LEED-CI calculations at all since they are outside of the scope of the upfit**, but any project that upgraded or is considering upgrading from a v2 system to it's v3 equivalent should take note of this change and evaluate the impact on their scores and ability to meet the WEp1 prerequisite.

**NOTE - 02.17.10 - Nathan has questioned the accuracy of the assumption that the existing fixtures would be outside of the scope of the prerequisite in the comments, and I don't have an 2009 IDC reference guide on-hand to refer to so I can provide a definitive answer. I've always been a little hazy on how the scope of a LEED-CI project is set, and since I don't have direct experience in LEED-CI I could very possibly be wrong!

Why You're Not Going to Get the Extra Point(s) for WEc1, Water Efficient Landscaping

I've had an issue come up multiple times in the past few weeks that I hope in telling will prevent you from similar headaches. In multiple projects that I've been involved in, we have situations where 100% of the water used for landscaping is being supplied by non-potable sources, yet in every case we will not be earning the 2nd point (v2 rating systems) or the other 2 points (v3 rating systems) for WEc1, Water Efficient Landscaping... Why, you ask?

Read Carefully!

The issue with WEc1 is that the basic requirements listed in the rating system omit a very key statement which can only be found buried deep in the reference guides. Here I'm quoting from the LEED-NCv2.2 reference guide, but I checked and the v3 edition has the same problem:

"If the Percent Reduction of Potable Water is equal to or greater than 50%, WEc1.1 is earned."

So far, so good... nothing unexpected... but wait!

"If the Percent Reduction of Potable Water is 100%, you must also calculate the Percent Reduction of Total Water (Potable plus Reuse) according to Equation 7 […the long one where you have all the landscape coefficients and such]. If the Percent Reduction of Potable Water is 100% and the Percent reduction of Total Water is equal to or greater than 50%, WEc1.2 is earned in addition to WEc1.1.

The problem here is that the rating systems (the requirements you get to view for free) make no mention anywhere of the fact that TOTAL water use, not just potable, must be reduced by 50% along with the 100% potable water reduction in order to earn the additional point(s). It only shows up deep in the "Calculations" section of the reference guides...

If you have ample supply of non-potable water sources for a project, it is less likely that the design team has examined in detail the total water consumption of the landscaping as performing these calculations is time-consuming (read: costly).

Why this requirement isn’t stated upfront in the credit language is lost on me, but the fact remains we must not only reduce potable water use completely but also total water demand based on the LEED calculations. Had I recognized this before the latest update, I would certainly have suggested an amendment to the rating system during the public review. Let's all make an effort to correct this during public comments for the v4 rating systems!

Disagree with my interpretation? Did you slip one by a review team and get the extra points without anyone noticing? Let us know by leaving a comment!

SRI Values for Copper Roofing - Old vs. New

A former classmate of mine who is working on a LEED renovation project for Meadors Inc., contacted me recently with two questions. What’s the SRI for copper, and for materials that patina over time do you submit the original SRI value or the aged SRI value for SSc7.2 Heat Island Effect, Roof? I didn't know the answer to either question, but after searching I was able to track down Paul Berdahl of the the Lawrence Berkeley National Laboratory's Heat Island Group, who was kind enough to offer to run tests on a few samples of various ages. You can see how quickly the patina changes in the photo below, where the most recently installed roof is in the background:

Copper Roof Installation - Broad Street, Charleston, SC

Photo Credit: Meadors, Inc.

The results for the samples are as you might expect; the copper has a high SRI when new but quickly loses reflectivity as it patinas with time. Strangely when it gets really old it starts to climb up in SRI value again, though not enough to put you in compliance with LEED's requirements. Here's a table of the results:

DescriptionAppearanceSRISolar ReflectanceThermal Emittance
NewBright Copper690.7580.045
2 Weeks OldBright Copper w/ Slight Smudges620.7290.028
Approx. 1 Year OldBrown w/ Green Flecks20.1760.642
Approx. 5 Years OldBrown40.1900.654
50-75 Years OldBrown w/ Light Green Spots and Streaks140.2450.688

Use the above figures at your own risk (this is in no way an 'official' USGBC accepted set of SRI values), but reason would dictate that most copper roofs would have the same characteristics. The question still remains about which value to use, and that is open to some interpretation.

Credit interpretation rulings for SSc7.2 yielded no inquiries about materials that have a non-stable SRI value. Although this is simple conjecture, given the rapid deterioration in SRI for copper (non-compliant within a year, likely much sooner), I would suggest that this product is not in compliance with the intent of the credit which is to reduce heat islands. Clearly for the majority of the life of the copper roof will help foster heat island issues and not reduce them.

What if there are products that deteriorate more slowly, or even become more reflective over time? If I were to write my own credit interpretation request on the subject, I would propose developing a sort of weighted SRI over the course of the expected life of the product, likely a difficult task. What I mean in simple terms is that if we had a product expected to last ten years with an initial SRI of 100 and an SRI of 0 on year ten then the 'weighted' SRI would be 50 assuming a linear decline (90 after one year, 80 after two, etc.). A product such as copper that has some crazy parabolic arc would probably require an excel spreadsheet (or graphing calculator) to determine the lifetime average, but clearly the number for copper would be so low that it's probably not worth the effort. If you've already been through this situation and gotten an official ruling PLEASE share by leaving a comment!

This post wouldn't have been possible if it weren't for the nice folks at Meadors Inc. agreeing to share the results of these tests with all of you and the guys at LBL for doing the testing in the first place. The projects that spurred this post are two historic renovations in the epicenter of Charleston, SC's historic district, 93 Broad St. and 97 Broad St., hence their restriction to use appropriate copper roofing products. You can view galleries of the projects at the links above. Many thanks!

Defining Regularly Occupied Space: Outliers

While looking into a question about whether or not a particular fixture qualifies for task lighting (it did... I think), I stumbled upon a CIR that explained the differences between what is considered regularly occupied spaces (ROS) in a residential space vs. non-residential spaces.  That has since blossomed into me going through each applicable credit and seeing what pops up...

I decided it would be useful to summarize the ROS rulings for weird spaces here... Understand that I'm rather scant on details here, so if you have a space that sounds close to one of these below it's probably worth reading the full summary before making a final decision. Those with access can reach the CIRs here.

Ahhh-cue-pied

Get it?

In each case below, the rating system, credit, and ruling date for the applicable CIR are included for further research on your own.  In many instances, the rulings do not expressly state that some of these areas are or are not regularly occupied, but the inferences are fairly clear.  In some instances, a space may be listed both as ROS and non ROS based on very slight changes of use. I strongly recommend reading the original rulings if you think it may apply to your project!

Regularly Occupied

  • Shipping and recieving warehouses in an industrial facility (LEED-NCv2.2 - EQc6.1 - 01.18.08)
  • Manufacturing floor in an industrial facility (LEED-NCv2.2 - EQc6.1 - 01.18.08)
  • Prison cells in a prison(LEED-NCv2.2 - EQc6.1 - 08.13.08)
  • Reading/work stations for patrons at a library (LEED-NCv2.2 - EQc6.1 - 10.22.07)
  • All spaces except closets, utility rooms, other storage areas, and bathrooms in residences (LEED-NCv2.2 - EQc6.1 - 05.12.07 and revised 10.13.07)
  • Nurses stations in hospitals  (LEED-NCv2.2 - EQc6.2 - 07.14.08)
  • Rarely occupied assembly halls in army facilities (LEED-NCv2.2 - EQc8.1 - 05.12.09)
  • Courtrooms, holding cells, and jury deliberation rooms if no security requirements impede the ability for views in a courthouse (LEED-NCv2.2 - EQc8.2 - 03.22.07)
  • A greenhouse in a school where classes or groups occupy the space as part of classes (LEED-NCv2.0 and 2.1 - EQc6.1 - 01.24.06) 
  • Gymnasium, cafeterias, conference rooms, libraries, and staff lounges for faculty work in elementary schools (LEED-NCv2.0 and 2.1 - EQc6.1 - 10.05.04)
  • Circulation paths within open office environments in offices (LEED-NCv2.0 and 2.1 - EQc6.1 - 06.26.01)
  • "Roving scientist" desk areas used intermittantly in the California Academy of Sciences (LEED-NCv2.0 and 2.1 - EQc8.2 - 12.21.04)
  • Industrial shop in a metal piping and duct fabrication facility (LEED-NCv2.0 and 2.1 - EQc8.2 - 08.29.03)
  • Portions of warehouse space where truck receiving and unloading occurs and occupants work all day in an industrial wherehouse (LEED-CSv2.0 - EQc8.2 - 10.21.08)

Non-Regularly Occupied

  • Lobbies, circulation areas, and book shelf stacks in libraries (LEED-NCv2.2 - EQc6.1 - 10.22.07)
  • Closets, utility rooms, other storage areas, and bathrooms in residences (LEED-NCv2.2 - EQc6.1 - 05.12.07 and revised 10.13.07)
  • Exam rooms and break rooms in hospitals  (LEED-NCv2.2 - EQc6.2 - 07.14.08)
  • Rarely occupied warehouse area when employees are assigned office space elsewhere in a warehouse (LEED-NCv2.2 - EQc8.1 - 01.29.08)
  • (maybe) Simulation labs in a college facility (LEED-NCv2.2 - EQc8.1 - 04.20.07)
  • Secure teaching labs (owner previously had issues with patent infringement) in a corporate training facility (LEED-NCv2.2 - EQc8.2 - 10.21.08)
  • Courtrooms, holding cells, and jury deliberation rooms if security requirements impede the ability to allow views in a courthouse (LEED-NCv2.2 - EQc8.2 - 03.22.07)
  • Pick-up area/lobby for a food bank (LEED-NCv2.0 and 2.1 - EQc6.1 - 08.09.06)
  • Recieving/Processing area where no employees are 'stationed' in a household materials collection facilty (LEED-NCv2.0 and 2.1 - EQc6.1 - 09.19.06)
  • A greenhouse in a school where classes or groups do not occupy the space as part of classes in a school (LEED-NCv2.0 and 2.1 - EQc6.1 - 01.24.06)
  • Staff lounge if only used for short breaks and not for faculty work in an elementary school (LEED-NCv2.0 and 2.1 - EQc6.1 - 10.05.04)
  • Computer training and multi-media conference rooms in a multi-use building (LEED-NCv2.0 and 2.1 - EQc8.2 - 05.24.04)
  • Field house and competition gym in a... field house and competition gym? (LEED-NCv2.0 and 2.1 - EQc8.2 - 03.04.03)
  • Sales stations where only final sales are completed (otherwise employees are on the floor with customers) in a retail store (LEED-CI - EQc6.1 - 02.24.09)

Getting Your S(h)ite Together: Project Boundary Definitions and LEED

I'll let you figure out how to read the title (you may want to cover your children's ears for one of them), but the following post will cover some helpful practical info I've recently learned the hard way. Basically, there are a set of figures and data that must be consistent across various LEED credits. This isn't a big problem, but it's very easy for separate trades (civil, landscaping, architect, electrical) to be working from different sets of drawings with slightly different figures. If everyone finishes their documentation with different numbers, someone is going to end up doing their work over, which is a huge annoyance and waste of every one's time.

LEED Data File

Though the following may seem obvious for those working on simple projects, determining a site boundary gets much more complex once you add multiple buildings or on a nebulous site, i.e. a campus or master-planned development. Your boundary may end up changing over time, and it's really only important that these numbers are nailed down before everyone starts their final documentation, but at the same time I like to keep them updated so I can do back of napkin calculations over the course of the project to make sure we're on the right track and no nasty surprises emerge (e.g. "Oh yeah... we're going to need another 2 acres of open space"). Please note the proper use of both i.e. and e.g. in the above paragraph... I had to look up the usage to make sure I got it right!

The Reasonable Project Boundary's Impact

Some of you may be lucky enough to work on a clearly defined site with easy to understand boundaries. I have yet to be so lucky. Even the single buildings I'm working on seem to always be in a campus or master planned setting. As a result, there is no clear boundary and LEED allows you to determine a 'reasonable' one. More on that later... This is probably the most important item to define early on, as it will affect SSc2 (development density), SSc5.1 (protect habitat), SSc5.2 (open space), SSc6.1 and 6.2 (stormwater quantity and quality), SSc7.1 (heat island, non-roof), SSc8 (light pollution), and WEc1.1 and 1.2 (water efficient landscaping) calculations. Once the building is sited, it quickly becomes difficult to make changes. What makes it even more critical to determine is the fact that typically these credits are typically divided among four design team members: the architect, civil engineer, electrical engineer, and landscape architect. Even in the ideal world of total integrated design, at some point these folks are each going to be putting the finishing touches on the LEED documentation at their desk all alone. It's critical that if one party makes changes that the others are made aware and can adjust accordingly!

When Do I Need a Reasonable Project Boundary?

Again, if you have a single building on a "normal" site none of the following should apply to you. When the calculations call for volume and rate of stormwater leaving the site or allowable footcandles a 15 feet from the site boundary you're stuck with what you have. When your building is in the middle of a master planned development where your 'site' drains to retention facilities a block or two over and you're stuck with site lighting standards that run along the edge of your 'property' things get much more complex. Even though the stormwater is leaving the area around my building, it's not a drain (HA!) on the local infrastructure, and that lighting doesn't trespass on anyone, it's just to light a sidewalk that connects my building to one next door... Why should my project's rating be punished for good design that just happens to span large distances?

It's for issues such as these that the USGBC drafted the slightly helpful LEED-NC Application Guide for Multiple Buildings and On-Campus Building Projects(AGMBC), which provides (not enough) guidance on how you can mitigate these issues. Essentially, you're allowed expand your site boundary to include large-scale measures such as those mentioned above. I've written about a few other multiple buildings issues here

How Do I Determine a Reasonable Project Boundary?

This is where things get confusing. Though it's briefly mentioned in the AGMBC, it wasn't clear to me how this really works until I received some clarification from a VERY HELPFUL certification coordinator at the USGBC. This is in reference to a project where we have multiple buildings being certified within a larger masterplan:

Given that there are several buildings within one development you may choose to take the multi-building/campus approach when applying for particular credits, especially related to site issues. In that case you would have a larger campus/development site boundary and then separate buildings within that boundary. By following the AGMBC, it allows for these different boundaries (campus boundary vs. project boundary within campus) that may apply for different credits. The campus boundary must be consistent for all credits for which the campus boundary applies and project boundary must be consistent for all credits for which that boundary applies. It is up to the project team how to determine these boundaries for your particular projects whether by drainage plain, or some other means. However things such as open space and walkways may not be counted for more than one LEED building unless taking an aggregate approach.

As you can see, what we're really talking about here is TWO boundaries... one for the campus and one for the project. Before I tell you what we're doing in this regard, it's very important that I tell you that they have not yet been approved as correct by the USGBC review team at this point. I will be sure to update this post when that happens.
Upside Down Man Site

This picture is meaningless, but it looks like an upside-down man and I figured... What the hell? There's too much text in this post anyway.

We decided that instead of using the entire development as our campus boundary, the area that feeds into a set of retention ponds would mark our campus, as that completely contains the all of the buildings that are seeking certification. As such, the stormwater documentation for all buildings will be identical. On one edge we extended the boundary to include some of the lighting we are installing along road that our buildings front. If we used the stormwater boundary one or two lights (out of many) would 'trespass' onto the adjacent site, but since it's still all internal to the larger development I don't feel guilty. On the whole, it's still a responsible development. The only reason we didn't set the whole development as the campus boundary is because it would be difficult to pull complete stormwater data for everything. Our engineers were doing calculations on the area we've included already.

Our project boundaries were determined by the amount of open space needed to satisfy requirements for each building. I can hear many of you thinking about what a sham this is... that we're just setting boundaries in a point-mongering mentality. Though in a literal sense you're technically correct, it's important to note that the vast majority of the area surrounding our buildings is vegetated open space, a feat that was accomplished through the use of multi-story structured parking (at great expense to the owner) in an area that is generally characterized by large swaths of surface parking. Again, we have met the intent of the credit, and I feel that on the whole we're well within our rights to claim the space.

To get to this point took a lot of back and forth between civil engineers, electrical engineers, and the project architect. We had to set a boundary, examine it from all sides, and reset the rest to that which is the best fit. Where on a 'normal' project I would suggest that materials selection and procurement is going to be your most frustrating task, on multiple buildings projects it's clearly these site issues that get to be a hassle. We've known all along that we're doing the right thing, it's just a matter of putting it in an acceptable framework to meet the credit requirements.

Working on other projects has made me realize that how you determine these boundaries will be driven by different factors for different situations. PLEASE share your experiences with the world by leaving a comment!

Parking Capacity Problems Solved (LEED credit SS4.4)

DRY POST ALERT - HUMOR LACKING BELOW

Back from break and working on some alternative transportation documentation for Sustainable Sites credit 4.4 - Alternative Transportation, Parking Capacity, I ran into trouble when the link in the reference guide to the Portland, Oregon zoning code (Title 33, Chapter 33.266 to be exact) was dead on arrival... After I found it I thought I would share the link with my faithful readers lest the same problem arise for you: here it is.

Once I solved that problem I ran into the problem of interpreting the code itself. The project I'm working on is a huge general office building in an area with no local zoning requirement for parking.  In that scenario, the LEED-NCv2.2 reference guide refers you to the Portland code mentioned above, or an ITE Parking Generation Study that you have to buy if the Portland code doesn't fit your project well enough.

I would normally regard this site as providing limited parking given the number of full time occupants (4 spaces for every 5 full-time workers), so I was surprised to find we still exceeded the minimum Portland code parking requirement by over 26%! See image below for allowances - "Standard A" is the minimum and "Standard B" is the maximum allowed...

Section of the referenced Portland Code

Section of the applicable Portland zoning code

We're pretty tight on points right now, so I instantly became worried.  The next thing I did was re-read the reference manual and was able to breathe a sigh of relief.  Unlike the normal requirement for option 1 where you are not to exceed the MINIMUM local parking requirements, the alternative method only requires you to meet the already stringent code, essentially only forcing you to provide less than the maximum allowable parking. Looking at it in this light, we were also 26% BELOW the maximum allowable parking, so we fell well within the requirement.

I looked for a CIR to confirm this interpretation, but have been unable to find one. The language seems very clear that you only need to meet the requirements ("Meet the requirements of Portland, Oregon, Zoning Code: Title 33, Chapter 33.266") instead of not exceeding the minimums, but I would love it if someone who has been through this issue before would leave a comment confirming my interpretation!

In other news, after a sizable break for the holidays I've got a good number of post ideas in the pipeline... Check back soon (and frequently) as Real Life LEED blasts into '09!

Determining Occupancy: Hotel Edition

I was recently asked how to determine occupancy for hotel rooms, found a credit interpretation ruling that included an acceptable formula, and decided to share it with you here! A CIR dated 5/13/2007 for a LEED-NCv2.1 project essentially stated that you would count all of the employees as full-time equivalent (FTE) occupants, and that you could use a multiplier for the persons/hotel room to determine a transient occupancy for the building.

The design team proposed that you would take the number of hotel rooms and multiply that by an average number of guests per occupied room of 2 people/room. Then multiply that number by the average room occupancy per night, which according to the American Hotel & Lodging Association is 63.1% for 2007. That leaves us with the following:

Hotel Rooms * 2 Guests/Room * .631 Occupancy Average = Transient Occupants

So for a hotel with 100 rooms you would get a result of 126.2, which after rounding leaves us with a transient occupancy of 127 for the hotel. Add to that the number of employees provided by the owner and you have your peak loading. Determining the number of FTEs is unfortunately up to you, as I would suspect this number varies greatly depending on whether the property is full or limited service, budget or luxury, etc. If anyone has any advice for FTE rules of thumb for hotels please share!

BONUS! Another CIR dated 9.14.2006 discussed the fact that hotel guests could reasonably be excluded from the bicycle rack requirements due to the serious doubt that anyone will be traveling from city to city overnight via bike.

Prove them wrong, naked hippie cyclist!

Hippie Cyclist

Determining Occupancy - The Original
Determining Occupancy - Residential Edition

FREE Online LEED Water Use Calculator

If you haven't found it already, Zurn has an online water use calculator that features a LEED option for comparisons. It allows you to quickly check the difference between various efficient fixtures for Water Efficiency Credit 3, Water Use Reduction. It isn't perfect (doesn't show total use reduction percentage), but it's extremely quick. It allows you to pick your scope (ie... if showers aren't in the project you simply don't include them), and the baseline fixtures are already loaded for you!

Zurn Water Use Calculator

Zurn Water Calculator

I could explain further, but just check it out yourself! Know of a better resource available for checking water use please share by leaving a comment.

Energy Modeling: Structure, Strengths and Loopholes

RealLifeLEED is (sadly) back from his glorious vacation, but is happy to continue bringing the best in obscure LEED resources to you hardcore in-the-trenches AP's. Today I'm letting you know about an interesting article written by PhD and ASHRAE Fellow Stephen Kavanaugh about the strengths and loopholes associated with energy modeling, specifically related to ASHRAE 90.1:

Rating High Performance Buildings: What Architects and Owners Should Know

This article brings up a good point about the ASHRAE model, specifically that it won't necessarily be a good representation of the actual energy use! Kavanaugh cites a study that found LEED building's modeled and actual energy use differed by an average of 62%!!! The small graph on the page indicates that it's a roughly 50/50 split between over and underestimations.

It's important to understand what is included in the energy model, and how you shouldn't guarantee the client anything about reduced electricity bills. Though the building is modeled to have low energy use, an owner with a penchant for ice-cold workspaces or a retailer who loves open front doors could ruin the best intentions of your designs.

I personally had little knowledge about what's included in the models until I took a VERY useful USGBC half-day workshop entitled "Understanding Energy Modeling in LEED for New Construction Projects". It was amazing to me how quickly you can use free modeling programs to setup a rough baseline building and play with different features and conservation measures to see where you stack up. The final model will need to be completed by someone who knows what they're doing, but early simulations can provide some interesting insights for amatuers.

Energy modeling problems or helpful hints? Please share your thoughts by leaving a comment!

Visible Transmittance: Rules of Thumb

There comes a time in every EQc8.1 Daylight & Views, Daylight 75% of Spaces calculation where you need to fill in value for the "visible transmittance" (Tvis) of the glazing, normally before you've actually specified the glazing. At least this is true for option one - glazing factor calculation, or option two - daylight simulation model. Of course if you're lazy you can pawn the responsibility off on some schmo who now has to measure the actual light levels after construction (option three - sounds expensive, but I wouldn't really know because I'm the schmo filling out option one all the time)...

EQc8 Supporting Calculator

You can wait until you've actually installed the windows to run the numbers, but unless you have copius amounts of glazing you're probably setting yourself up for an unhappy result. So what is a reasonable value for Tvis?

Your first assumption might be to notice that the "minimum Tvis" values for daylight glazing is 0.7, while the minimums all other glazing is 0.4. To be clear, these are not required minimums! You could potentially have a giant room made of nothing but Kalwall with a Tvis of something like .15 and still get the daylighting point. The "minimums" are really poorly named, as they are more like benchmarks of light transmission performance. The higher visible transmittance you have the better off your daylighting factor becomes.

Another thing that will help is to know that visible transmittance described by LEED as "Tvis" is frequently listed in different ways. I've seen VLT, VT, and other similar configurations. It's listed as a percentage or a decimal with about equal frequency. Pella uses a "VLT%" and lists whole numbers. A "53" rating for their products yields a 0.53 rating for LEED.

The Values

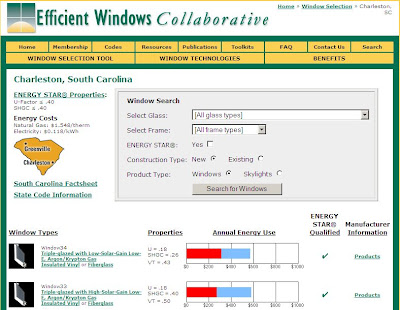
You probably won't see any values much higher than .7, and that's for clear glass. As a general rule, the better the window is as an insulator, the lower the visible transmittance. If I was running through a daylight calculation without having already selected the windows, I would assume the 0.4 or .45 Tvis for ALL windows, as that tends to be the lower end of what's available. A more accurate average would probably be closer to 0.5-0.6, but don't hold me to those numbers! I would stick on the conservative side until I knew otherwise, but then again you will need far greater area of window to make up for a lower Tvis value. The bottom line is that if you assume too low of a Tvis value then you're oversizing the windows, but too high and then you risk losing your points (and good daylighting) if you undersize the glazing. The Efficient Windows Collaborative has a very helpful tool for showing the tradeoff between a lot of light coming into the building and heat gain. Note that the highest Tvis for "EnergyStar" qualified windows in Charleston is 0.55

Efficient Windows Collaborative

Common Manufacturer Tvis Ratings

  • Pella - Put in your zip code and then go to the list that says "Document Types" and select "U-factor, Solar Heat Gain Coefficient..."
  • Anderson - Anderson lists their VT ratings under the "Performance" tab of the basic product description page.
  • If you have a site to add covering Tvis please let us know in the comments section!

LEED CS folks look out!

For some reason the USGBC has left off a valuable tool from the LEED-CS credit pages on LEED-Online for EQc8.1 and EQc8.2! On the LEED-NC projects there is a VERY helpful EQc8 Credit Calculator for you to use that can be found on those pages. The CS and NC requirements are the same for these points with the exception of developing a feasible tenant layout. It's an interactive PDF that adds up all your square footage room by room and then runs the calculations for both EQc8 credits. All you have to do is input the glazing square footage, the Tvis, and where it's located (vision sidelight, daylight sidelight, skylight, etc.) and it will tell you where you stand. The EQc8 Supporting Calculator can be found here!!! The link will direct you to the LEED-NC sample credit templates for Environmental Quality. You will need to extract all of them and toss the rest. The file you want is EQc8-SupportingCalculator.

Rounding up or down?

If you're looking at preferred parking (SSc4.3) for and you determine that your project needs 4.15 LEV parking spaces, how many should you provide, 4 or 5? While this is a relatively harmless difference (one more sign probably won't break the bank), the difference between 1 or 2 showers (SSc4.2) might be more of an issue in an small office building.
I wasn't sure about this answer until I noticed that the credit templates solved the answer for me. One tenth of a shower is a full shower, and rounding up, even when the numbers would typically be rounded down is the norm.
Take the following example:
5% of 180 FTE is 9.00000 secure bicycle storage spaces require. If we add one more FTE, then 5% of 181 is 9.05, which in most minds would round down to 9. In this case however, the LEED credit calculator rounds the number up to 10 required spaces: